Whenever you create a new MRF order or quote, or recall an existing one, Micronet displays the MRF Order Header where you enter the main details of the order or quote.
Refer to "Creating a New MRF Order or Quote" or "Recalling an MRF Order or Quote".
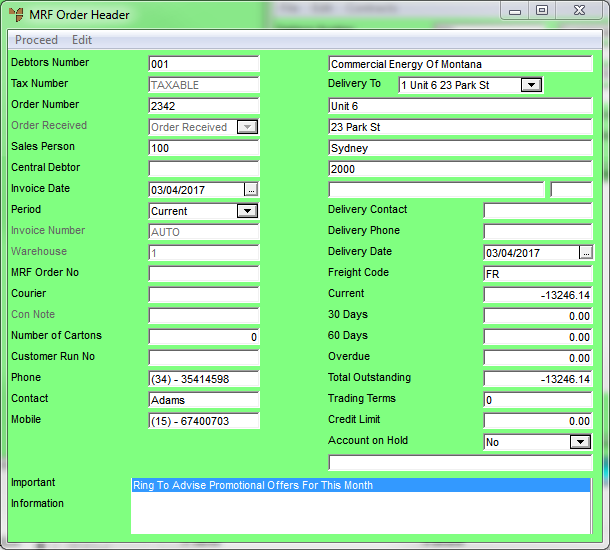
Micronet displays the MRF Order Header screen.
|
|
Field |
Value |
|---|---|---|
|
|
Debtors Number |
Micronet displays the ID and description of the debtor you entered on the MRF Order Creation screen. |
|
|

|
Technical Tip If you change the debtor on an invoice/sales order that already has lines added, and your user ID has security to change invoice pricing, Micronet displays a message asking if you want to reprice the invoice/sales order. Selecting Yes reprices the invoice/sales order lines to the default pricing and discounts for the new debtor. Selecting No retains the existing pricing and discounts. If your user ID does not have sufficient security to change invoice pricing, Micronet automatically reprices the invoice/sales order lines to the default pricing and discounts for the new debtor. The user security for this option is set in the Override Invoice Pricing field on your user ID – see "Maintenance - Edit UserIDs - 4. MDS Security". |
|
|
Tax Number |
Micronet displays the debtor's default tax number from the Debtor master file. (For more information, refer to "File - Debtor - Debtor".) |
|
|
Order Number |
Enter the customer's order number if required. |
|
|
Order Received |
|
|
|
Delivery To |
Micronet displays the customer's postal address. You can select an alternative delivery address if required. Debtor delivery addresses are setup in the Debtor master file – see "File - Debtor - Debtor" and "File - Debtor - Delivery". |
|
Delivery Date |
Enter or select the delivery date for the order. |
|
|
|
Freight Code |
Enter a freight code for the order. You can also press spacebar then Enter to select a freight code. You must enter a freight code if you are using SmartFreight. |
|
|
Sales Person |
Micronet displays the default salesperson for this debtor. You can enter a different salesperson for this sale if required. Press Delete then Enter to select a salesperson. 2.8 Feature If the salesperson you want does not appear in the list of salespeople, it is probably because they have been made inactive – see "File - Salesperson - Sales Person". |
|
Central Debtor |
If this debtor has a central debtor for invoicing, Micronet displays the central debtor. |
|
|
Invoice Date |
Micronet displays today's date as the order date. Enter or select another date if required. |
|
Period |
Select the General Ledger period you want to post the invoice to on the customer account. |
|
|
Invoice Number |
Enter the invoice number if required. |
|
|
Warehouse |
Enter or select the warehouse that the items for this sale are to be supplied from. |
|
|
MRF Order Number |
Micronet displays the MRF order number. |
|
|
Courier |
Enter a courier for this order. You can also press spacebar then Enter to select a courier. You must enter a courier if you are using SmartFreight. |
|
|
Con Note |
If you are printing courier labels, you can enter the next consignment note number. However, if you process invoices as a batch, Micronet automatically assigns this number during processing. |
|
|
Number of Cartons |
If you know how many cartons this order will be packaged in for courier delivery, enter the number. Micronet uses this number to determine how many labels it needs to print. You must enter the number of cartons if you are using SmartFreight. |
|
|
Customer Run No |
Micronet displays the debtor's default run number for standing orders from the Debtors master file – see "File - Debtor - Debtor". For more information on standing orders, see "Sales - Standing Orders". |
|
|
Phone |
Micronet displays the default phone number for the debtor from the Debtors master file. |
|
|
Contact |
Micronet displays the name of the main contact for this debtor. |
|
Mobile |
Micronet displays the default mobile phone number for this debtor. |
|
|
|
Current |
Micronet displays the amount owed by this debtor for the current month. |
|
|
30 Days |
Micronet displays the amount owed by this debtor for the previous month. |
|
|
60 Days |
Micronet displays the amount owed by this debtor for two months prior to the current month. |
|
|
Overdue |
Micronet displays any amount owing that is overdue. |
|
|
Total Outstanding |
Micronet displays the total outstanding amount for this debtor. |
|
|
Trading Terms |
Micronet displays any trading terms set for this debtor. |
|
|
Credit Limit |
Micronet displays any credit limit set for this debtor. |
|
|
Account on Hold |
Micronet displays Yes if this account has been placed on hold, or No if it has not. |
|
|
Important Information |
Micronet displays any added text in the Debtors master file that is assigned to display as important information on invoices. |
Micronet redisplays the MRF Order Creation screen.